Wednesday, February 27, 2019

Reversing C++ codes tutorial series: Virtual Functions and Polymorphism

In this post, I will be sharing how a key concept in OOP; Polymorphism. I will also share how to identify Virtual functions.

Key takeaways:
1. Identify the differences between static and virtual functions.

Assumptions
The example code only has a single class and one child class. Both parent and child classes has one virtual function on top of the static ones.

Let me begin with this C++ code:


Explanation on what the above code does
The above code first define a "Animal" class. The "Animal" class contains 3 public variables "name", "food" and "legs". It also has 4 member functions. "Animal()" is the constructor while "~Animal()" is the destructor function. "Naming" is a member function implemented to interact with the "name" variable in the object of "Animal" class. "Eating" is also a member function but its a Virtual function that interact with variable "food".

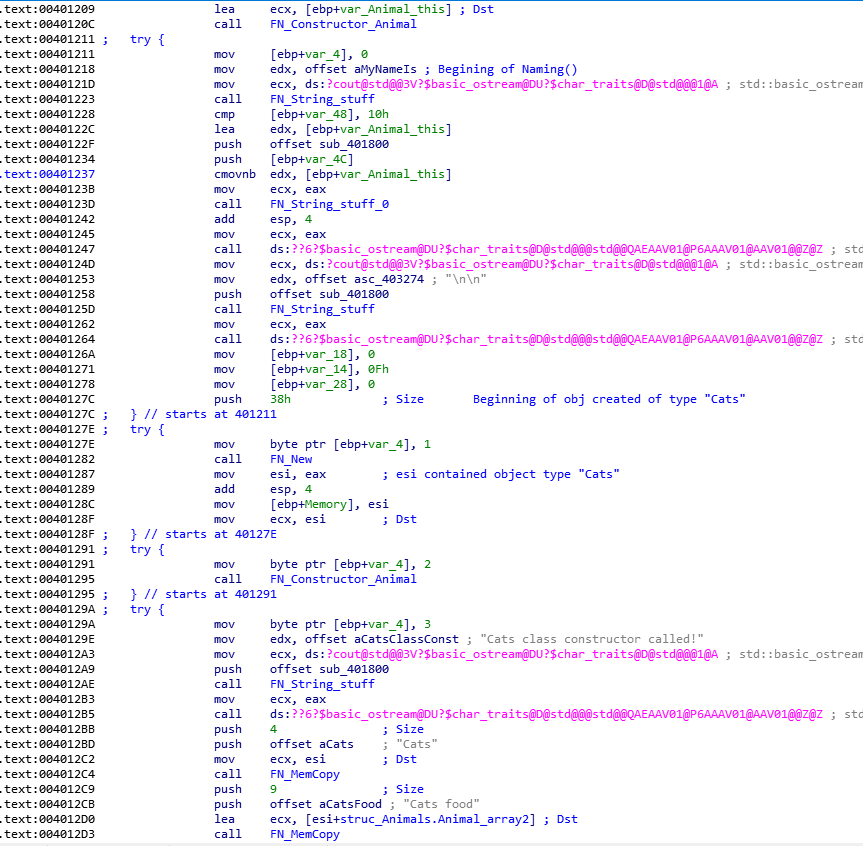
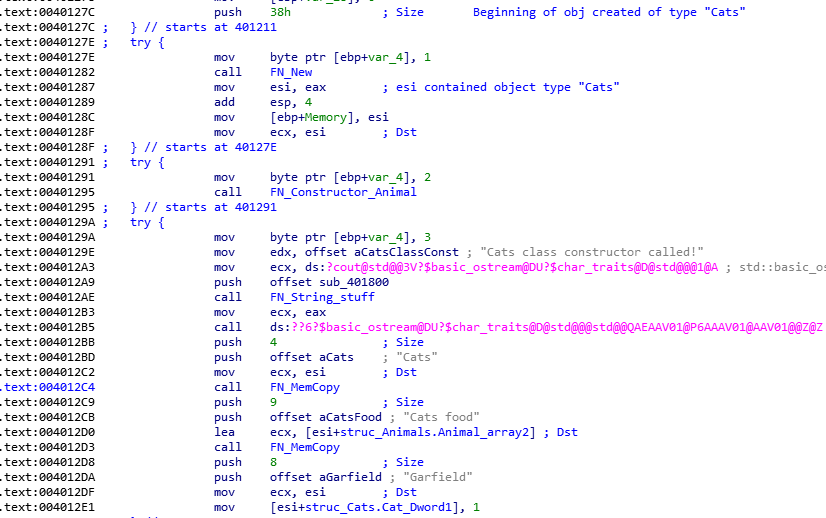
Next, is the definition of a "Cats" class which is a child class of "Animal".The "Cats" class contains variable "toys" and 4 member functions. "Cats()" is the constructor while "~Cats()" is the destructor function. "Playing" is a member function implemented to interact with the "toys" variable in the object of "Cats" class. "Eating" is also a member function but its a Virtual function that interact with variable "food".

Use of virtual function allows the correct virtual function to be called based on the object type. In this example, the object of class "Animal" would use a different "Eating" function comparing to the one in "Cats". The following shows the output when the above C++ code is executed. Note the output string from "Eating" function for "Animal" object is different from the one for "Cats".

This demonstrate a key concept in OOP, Polymorphism.

Next is the "Cats" class with 1 public variable "toys". It also have constructor and destructor functions. "Playing" is a member function implemented to interact with the "toys" variable in the object of "Cats" class.

Inside the main function, an object "Generic_Animal" of type class "Animal" is created. And its member functions "Naming" and "Eating" are called. Then an object pointed by "pCat1" of type class "Cats" is created. The variables "name" and "food" are overwritten with different strings for the object. Finally, the member functions "Playing" and "Eating" are called.

Analysing the compiled version of the above C++ code
Let's begin by looking into the constructor of the "Animal" class


EBX contained the address of the object of type "Animal" class. The first value being initialized is the 'Vftable' or Virtual Function Table. This table contained the address of the virtual functions in the object. In this case its the "Eating" virtual function.


Now we will construct a struct to represent the members in "Animal" class. Take note how the start of the object will be pointer to the Virtual Function table (Vftable) if a virtual function is present.


I will skip over the constructor and struct for "Cats" class. However, if you need help just leave a comment below.

1. Identify the differences between static and virtual functions.
Now, I will go over the difference between static and virtual functions. The following code snipped at the late part of Main().

The first call is made to "FN_Cats_Playing" which is the "Playing" function in "Cats" class. Next, the Virtual Function table of "Cats" class is retrieve and the "Call" instruction is made to the first function in the Vftable. The first function is "Eating" in the object of type "Cats".

Monday, February 25, 2019

Reversing C++ codes tutorial series: Inheritance and Dynamic memory

In this post, I will be sharing a key concept in OOP; Inheritance. I will also make use of dynamic memory to store the new objects.

Key takeaways:
1. Identify the differences between object creation of parent from child class.
2. Track the creation of objects using dynamic memory (Heap).

Assumptions
The example code only has a single class and 1 child class. The member functions in class are all static.

Let me begin with this C++ code:


Explanation on what the above code does
Please ignore the commented out codes they will be un-commented for next blog post.

Explanation on what the above code does
The above code first define a "Animal" class. The "Animal" class contains 3 public variables "name", "food" and "legs". It also has 3 member functions. "Animal()" is the constructor while "~Animal()" is the destructor function. "Naming" is a member function implemented to interact with the "name" variable in the object of "Animal" class.

Next is the "Cats" class with 1 public variable "toys". It also have constructor and destructor functions. "Playing" is a member function implemented to interact with the "toys" variable in the object of "Cats" class.

Inside the main function, an object "Generic_Animal" of type class "Animal" is created. And its member function "Naming" is called. Then an object pointed by "pCat1" of type class "Cats" is created. Note that this object is created using the "new" keyword. Finally, the member functions "Naming" and "Playing" are called.


Analysing the compiled version of the above C++ code
Let's look at the main() of the binary.


I have gone ahead to label the constructor of Animal class as "FN_Constructor_Animal", functions related to using of std:string as "FN_String_stuff_XX", function related to use of "New" keyword as "FN_New" and mem copy as FN_MemCopy". If you have trouble understanding how/why I labeled these functions please leave a comment I will explain with more details.

1. Identify the differences between object creation of parent from child class.
For the object of type class "Animal", it is created in the "FN_Constructor_Animal" function.

Next is the creation object of type class "Cats". Very soon after the "FN_New" the "FN_Constructor_Animal" is called. This is because "Cats" is the child class of "Animal". So the object of type "Cats" will first be populated with the members of class "Animal". This is the OOP concept, Inheritance.

Following the "FN_Constructor_Animal" you will see the constructor of "Cats" where the member variables "name" and "food" are overwritten those in "Cats". An additional member variable, "toys" is appended to the object of type "Cats".
This is where you can create the struct for "Animal" and "Cats".


2. Track the creation of objects using dynamic memory (Heap).
Zooming into the construction of object type "Cats"

We notice the use of "FN_New". Inside this function contains a call to malloc(), the key is to note the return address of "FN_New" is in the Heap memory which is used to store dynamically allocated memory. The other thing to note is the value 0x38 at 0x0040127C. This is the size of the object created. So we know the size and address of the object type "Cats".

The following picture show the contents of object type "Cats" in the Heap memory. At 0x00401287 the value of EAX contained the address of the object created in Heap memory.


Next, the constructor of the "Animal" class is called and the member variables and functions are populated. The following happened at 0x00401295 after "FN_Constructor_Animal" is called.


Inside the constructor of the "Cats" class the "name" and "food" member variables are overwritten.(0x004012C4 and 0x004012D3). Do note the member variable "legs" remained unchanged but a new member variable "toys" is appended! (0x04012E1)


Knowing where the object of type "Cats" is created allowed us to trace the changes taken place inside it.

Reversing C++ codes tutorial series: Classes and its members

In this post, I will be sharing how C++ classes are constructed and its members are accessed.

Key takeaways:
1. Identifying functions written using C++
2. Identifying constructor functions
3. Rebuilding the Class structures using Struct in IDA
4. Understanding how the member variables are accessed in an object.

Assumptions
The example code has a single class. Member functions in the class are all static. All the objects created from the class are stored in local variable and not in the dynamic memory (Heap).

Let me begin with this C++ code:


Explanations on what the above code does
The above code first define a "Fighters" class. The "Fighters" class contains private variable "Stealth" which is only accessible by functions inside the "Fighters" class. The public variable "model","Health" and "Strength" are accessible from outside the "Fighters" class. There are two public member functions "add_steath" and "printinfo" that can be used to interact with the variables in the objects of the "Fighters" class. Finally is the constructor function that was used to initialize the variables in the objects of the "Fighters" class with default values.

Inside the main function, a object class of type "Fighters" is created and its information is displayed via "printinfo". Next, a "F16" class is created and the "Health" variable is updated to 100. Finally, a "F35" class is created with the variables "Health" and "Strength" updated. The "Stealth" variable can only be updated indirectly via the "add_stealth" function. As the "Stealth" variable is private.

Analysing the compiled version of the above C++ code
Let's look at the main() of the binary.


1. Identifying functions written using C++
Let begin by locating those functions written with C++. These functions that have an argument passed into them via register ECX. This argument is the "This" pointer. The "This" pointer is used to referenced the instance of the object and its contents (member functions and variables).

2. Identifying constructor functions
Among these C++ functions, we have to locate the constructor. This function is called whenever an instance of an object is created. Therefore, this function is called before the member functions of the class. The function that contained code that initializes the member variables would likely be the constructor.

This is the constructor of the "Fighters" class.


3. Rebuilding the Class structures using Struct in IDA
The ECX register is passed into the constructor function from the caller. ECX contained the "This" pointer. The "This" pointer value is then stored in the local variable "var_10". Next you will observe how values are stored into offsets from "var_10". At this point it would be useful to re-create the struct of the objects of the "Fighters" class.
To do so we can go to View->Open subviews->Structures or Shift+F9

Given the offset values and the types of data being initialized at the various offsets.
We will then create the structure of the "Fighers" class as shown below.


We can compare the struct to the "Fighters" class definition code as shown below.
1
2
3
4
5
6
Fighters() {
  model = "Default Model";
  Health = 50;
  Strength = 50;
  Stealth = 0;
 }

4. Understanding how the member variables are accessed in an object.
We will apply the struct offsets to the constructor by Right clicking on the offset and choose "Structure offset".


Next we can go on to label the offsets in main and other member functions of "Fighters" class.


After labeling the offsets and member functions we can have a better understanding of how the members of the class are accessed.

Thursday, February 21, 2019

Reversing C++ codes tutorial series: Introduction

I realised reversing binaries written using C++ with OOP is pretty challenging to some (including myself). I hope to write a series of posts to explain the steps of reversing these binaries. I will make use of both the C++ source and compiled codes in my explanations. I will also include some of the OO concepts in my posts as they impact the behaviors of the binaries.

I have no idea how many posts i will write for this series but I will try to keep each post short and focus on the key points.

I am by no means and OOP expert but by writing these posts, I hope to strengthen my learning and share what I learned to the community. As always I welcome all comments and questions to my post. :)

Tools I used:
1. MS Visual Studio 2017 Professional
2. IDA Pro

Thanks to a tip from @ronindey to remind me to add urls to individual posts in this series.

1. Classes and its members
2. Inheritance and Dynamic memory
3. Virtual Functions and Polymorphism


Friday, January 18, 2019

Windows Internals: Windows process and their handles

In this post, I will document a behavior of the Windows kernel structure, EProcess. EProcess is created whenever, a process is created in Windows. However, when a process terminate, we may assume EProcess just get cleaned up. However, this may not always be the case.

I will show what happens if a process is terminated but handles to the process is still held (or opened) by another process.

The following is a code that I will be using to explain this scenario:


The code is pretty simple. It used CreateProcessW() to launch a notepad process. Then, it calls WaitForSingleObject() to wait forever(infinite) till the notepad process is closed before the execution continues.

Using Process Explorer, we can observe a parent process that was created after the code is executed and then a child process (notepad.exe) will be created.


To demonstrate what happened to the EProcess structure of the notepad process, I will use local kernel debugging with Windbg.

First I will set a breakpoint at the following line.

1
2
  CloseHandle(pi.hProcess);//Handles must be explicitly closed if not parent process will hold on to it even if child process is terminated.
  CloseHandle(pi.hThread);


I will let the code compile and start debugging (F5 in VS2017).

A new EProcess structure for the notepad process will be created and let's see it in Windbg.


1
2
3
4
5
lkd> !process 0 0 notepad.exe
PROCESS fffffa800cdfab30
    SessionId: 1  Cid: 0e40    Peb: 7efdf000  ParentCid: 0ee4
    DirBase: 1510a000  ObjectTable: fffff8a003fd9dc0  HandleCount:  91.
    Image: notepad.exe

We can see this the only EProcess structure created for notepad.exe. At this point the code is waiting indefinitely till the notepad process is terminated (or signaled)

Using Process Explorer, we can observed 2 handles inside the process that was generated by the code. These 2 handles were generated when the child process (notepad.exe) was created.


Now let's close the notepad.exe application. The notepad process will now be terminated and the code will execute till the breakpoint is hit.

What we observed in Process Explorer:
1. The notepad process is no longer present.
2. The 2 handles to the notepad process is still present in the parent process.

However, when we go to windbg the EProcess structure for the notepad process is also still present.

Let's step over both lines of the following code in VS2017.

1
2
  CloseHandle(pi.hProcess);//Handles must be explicitly closed if not parent process will hold on to it even if child process is terminated.
  CloseHandle(pi.hThread);

The EProcess structure for the notepad process is GONE!

In summary,
The EProcess structure for a Windows process will only be removed after all the handles to the process is closed.

Please leave me any comments or questions below if you have any. :)

Additional notes:
The demo is done using Windows 7 x64, visual studio 2017 (VS2017), Windbg and Process Explorer.
Windbg is running as a local kernel debugging. (Able to only READ the kernel memory.)
Detail type information of the EProcess structure can be retrieved via this windbg command, dt nt!_EPROCESS
In Windows, processes and threads, signaled means that they are terminated.

Friday, May 4, 2018

Enabling Powershell 5 LOGGING for Windows 7

Powershell is a very common 'tool' used by attackers these days. Therefore, we need to monitor the use of it or be able to log it's activities during malware analysis. I found this blog from Fireeye that showed how to turn it on for Windows 7. However, its missing a few steps. After installing the necessary updates according to the blog, I wasn't able to see the logging configurations in the GP editor. 

Here I will document the steps needed to reveal the configurations in GP editor in Windows 7..

First you will need to download the necessary administrative templates here.

After installing the templates, you will need to locate the files “PowerShellExecutionPolicy.admx”, and the “PowerShellExecutionPolicy.adml”. They are copied to “\Program Files (x86)\Microsoft Group Policy” by the installer . 

Then copy them into %systemroot%\PolicyDefinitions.

After the above steps finally, you will see this in the GP editor in Windows 7.


Just to clarify here, I found the above steps from these blogs and forums.
https://www.fireeye.com/blog/threat-research/2016/02/greater_visibilityt.html
https://www.blackhillsinfosec.com/powershell-logging-blue-team/
https://social.technet.microsoft.com/Forums/ie/en-US/2f3c75ed-97e6-4b62-9157-2f7ef6766e19/powershell-gpo-settings-not-available-download-admx-file?forum=winserverGP


Sunday, April 29, 2018

Using IDA Pro debugger and IDApython script to label indirect functions calls.

One of the ways malware authors want to hide the intend of the malware he/she is writing is by keeping the Import Address Table small or filled with useless functions. To do so an IAT would be created during the execution of the malware. There would be many indirection function calls similar to the one below. (The boxes filled with Yellow are CALL instructions.)

Without executing the malware, its hard to determine which function would be called by these indirect function calls.

After executing the malware using the IDA debugger, we can see the in-direct function calls are pointing to addresses in a list of function pointers. The address of the function pointer is stored in the ESI register. E.g. Call [esi+3c]

To speed up our analysis we could now find a means to help us label the addresses of the in-direct function calls with the function names that it is referencing.
To do so we could use the following python script:


After running the script, we could see the address of the function pointers being renamed.

We will need to create a struct from the function pointers.

Finally, we could right click and label the in-direct function calls with the function that it is going to call.


I know I have left out a few steps like how to use IDAPro debugger, create a struct and details of the functions used in the script. Just leave me a comment or question if you need more details. :)

Thanks to @nullandnull's tweet reply, I have updated my script to support the following: